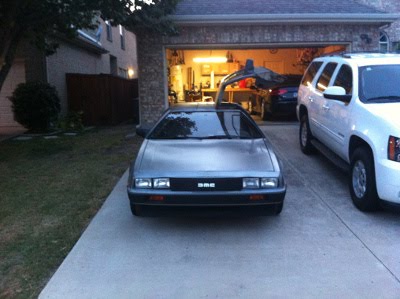
Day 1...

Day 1...

Tuesday, August 28, 2012

Trip to DMC-H

Was down in Houston earlier this week and got a chance to stop by the DMC Houston facility, which is actually in a suburb called Humble. I met James Espey (VP over there) and he gave me a nice tour of the place.


The facility was outstanding. These guys have a plethora of parts and are extremely helpful. These pictures were taken in the storage area of the facility.


One thing that was brought to my attention by James was the fact that not only are many of these parts still in their original boxed crates but some are also contained in the bins and shelves, which are the original storage components used in the factory back in Ireland. The bottom picture is where all the engines and transmissions are stored.

These next two pics are from the mechanic area. In the bottom pic (sorta hard to see) James and I are walking back towards the showroom. 


These next several pics are from the showroom where they had a couple of cars for sale along with some other cool stuff.


This pic was also in the showroom and I thought it was pretty interesting.


And finally here is a pic of me standing outside in front of some of the cars on the lot just before we left.


It was a fantastic visit and I look forward to doing it again in the future. The folks were extremely friendly and helpful. Props DMC-Houston!

Friday, August 24, 2012

Crack Repair Update

I haven't been able to accomplish a lot this week for various reasons. But I completed one layer of filler on the bad crack that we fiberglassed last weekend. I've been hand-sanding it a couple of nights this week. It looks like it will probably need one more layer of filler for a couple of voids in the previous layer. Then another sanding before primer and paint.

I've been sanding and doing similar work on the louvre. Probably one more layer of filler and sanding there as well.

I'm hoping to wrap up the filler and prep work this weekend. Paint will come shortly thereafter.

Monday, August 20, 2012

Progress Report

The cooling fan circuit has been completed and works properly now using a rocker switch custom mounted to one of the blanks next to the window switches on the console. This pic was snapped before I ran the switch wires and the relay grounds.


The rear louvre now has 1 layer of filler+fiberglass on the top side. Apparently I didn't use enough hardner and it took 2 days to completely dry. This week I will sand it down and add another layer. Once this is completed it will be prep & paint time, possibly as early as this weekend or next week.


Shaun came over again yesterday and helped me tackle a bad crack in the underbody between the engine bay and the rear window on the driver side. Fortunately it wasn't cracked all the way around the pontoon. Someone before me had attempted to repair the crack and failed. When were prepping the area for new fiberglass it appeared to be JB Weld or similar. At any rate, Shaun did a fantastic job of building up several layers of glass and working it into the difficult contour areas. In the end with both sides reglassed the fix is now structurally sound and rigid. I still have some sanding and filler work before painting the exposed underbody area but I'm really happy with the near-finished product.

The first pic is a shot of the underside of the crack. I forgot to photograph the top (exposed) side prior to the repair. The second pic is a shot of the repaired top side.


Aside from the prep/filler/paint work aforementioned, this week I plan to make a list of electrical issues to start sorting through. 

Thursday, August 16, 2012

More Glasswork and Cooling Fan Update

I've done some more fiberglass work on the rear louvre this week but ran out of disposable gloves. I'll grab some more in the next day or two so I can finish this part and post some updated pics.

In the meantime, I've completed my fan relay circuit as previously described. The nice things about this is I have not hacked into the original wiring. This is a plug-and-play solution that will plug directly into the 2 relay holders for the car's original fan relay circuit. Here's a pic of the finished product:


All I have to do is ground it, wire in the manual switch and plug it in.

I also got the title transfer knocked out today. Had to go to the downtown records building and file the paperwork. They wouldn't let me register it as an antique until I put insurance on it. Government stuff gives me tired-head.

I was watching Chasing Classic Cars this week on the Velocity channel and noticed a brief shot of a DeLorean.


Sunday, August 12, 2012

Busy Weekend

Well I had a little time to work on the car this afternoon. With the help of my cousin-in-law Shaun, I removed the rear louvre from the car and we began the task of repairing the cracks and  breaks using new fiberglass material and resin after doing all the prep work.


We were able to prep and glass the underside once this afternoon. This week I'm going to cut, sand and apply another layer of glass before flipping the louvre over and doing the top side. The top side is going to take more work. It has a significant amount of sun damage. Once I get it prepped and glassed, I'll sand the whole thing down and use body filler where needed to smooth everything out. Then we'll prime it and paint it in hopes to get as close to an original look as possible. I'll post more info and pics this week as this part of the project progresses.

While waiting on the resin to cure, and with Shaun still helping me out, we found where the bad left radiator fan wire/connection existed. It was on a molex plug where the connection had actually burned.
This plug was up inside the housing for the windshield washer fluid reservoir. What I'll likely do is find a water-proof plug and rewire this one particular wire. Once I get that knocked out, I'll be on the home stretch of the radiator fan task.

Friday, August 10, 2012

Hazard Light Button & Fan Update

I'm quickly becoming big fans of the DMC folks down in Houston. I've previously spoken to the CEO Stephen Wynne (no not the Vegas casino king) about my original pursuit of the Dallas car. He had some really good advice. Earlier this week I had posted a want thread on dmctalk.org for a hazard light button. James Espey (the VP) over at DMC Houston asked for my address and mailed me the button free of charge. Here it is installed:


I also had them turn an order for me online very fast. Ordered on a Wednesday - Parts arrived on a Friday. Props to those guys and their business. 

A quick update on the cooling fans - I found that one of the fan wires in the relay compartment (the left fan) had no continuity. I tested the fan directly and it worked so there is a wiring problem between the fan and the relay compartment. Instead of trying to hunt down the failed wiring, I'm going to run a replacement wire (14 gauge) from the relay compartment all the way to the fan. I'll have to pick up a 25' spool of wire this weekend, as all the wire I had in my garage was 10' or less (left over from other projects).


Tuesday, August 7, 2012

New Cooling Fan (Temporary) Solution

Today has been more planning and researching how to properly temp in the manual cooling fan switch. After sharing thoughts with some of the forum members today and yesterday, I've come to the conclusion to possibly use 2 relays and 2 20A ATC fuses (one for each fan). This way, if one fan fails and overloads the circuit, it won't take the other one out as a result. Here's what I've got so far:


I may omit the fan-fail relay portion for now, since I'm isolating the fans individually and this would require additional mapping and thought. In the process, I'm going to remove the original spec circuit breaker that currently is sequenced in between the fan and fan-fail relays.

So it looks like all I need to do at this point is pick up a couple of relays and fuse holders. I've got everything else left over from other projects already.

I'm going to have to test and rewire the second fan in the process. Hopefully I won't have any surprises on that second fan (fingers-crossed).

Here's a pic of the relay and fuse bank behind the passenger seat and above the battery compartment. Both the original fan and fan-fail relays are removed in this pic (this is where the Fanzilla was plugged-in). I will use the fuse-holder plugins from the Fanzilla to temp in my solution. Disregard the hack-wiring on the speakers. That will eventually all be removed.


Monday, August 6, 2012

Fanzilla Part II

The weekend came and went all too quickly. I was able to ascertain that the Fanzilla assembly is trash. As you can see from the previous post, the unit has overheated and partially melted on one side. I traded messages with an electrical engineer on the dmctalk.org forum who told me these units draw up to 3 ma continuously (when the car is not running). He sells replacement solid-state modules that use a time-delayed trigger to kick on the fans in a sequence depending on the inputs (AC compressor, Otterstat & ignition). They also get rid of the old circuit-breaker. This seems to be the solution and I received the pricing information for both the fan-relay module and fan-fail relay module. The fan fail portion of the circuit allows for the original indicator light (near the bottom of the AC controls panel) to work with the new solid-state equipment. All in (not including shipping) I'm looking at around $150 for the parts. I'll probably wait for a few months before I pull the trigger on this. In the meantime, I've determined a way to use a 40A or higher relay with a switch and a fuse to run the fans manually. I'm also going to include a second relay to indicate if the fuse blows and illuminate the fan fail indicator light.

In addition to the fan relay testing, I crawled up under the front end of the car and tested one of the fans (the other one had a hack-wiring tape job). The one I tested using the factory plug worked fine. I didn't notice any bearing or other audible issue. I'll fix the hack wiring sometime this week with proper solder and heat-shrink. 

I was hoping to get all this knocked out yesterday but I was too busy with other obligations. So these tasks have moved to my weeknight list for this week.

Also found this unplugged and coming from the speedo box. I found the other end and assume this is part of the Lambda system on the car (Service reminder system from DMC). I'll probably leave it unplugged for now, as I assume there's a reason it was unplugged in the first place.


Friday, August 3, 2012

Engine Air Intake + Fanzilla Part I

Yesterday afternoon I received my replacement air filter, duct & o-ring for the air intake on the engine. I decided I would go ahead and knock this out last night, which I did. The new duct was a little stiff and difficult to get everything to fit together just right but after a few tries and some fiddling I was able to get it done. This should give the K-Jet much better air flow. The old duct was partially collapsed and the filter was pretty nasty.


Yea I know, forgot to hook up the PCV hose. I'll do that tonight.

I'm still working on the damn radiator fan circuit. I want to make sure I understand how the Fanzilla after-market assembly functions before I start probing around. I studied the original circuit yesterday in the shop manual, but this after-market piece throws a kink in things a bit. I plan on working on the entire system this weekend and hopefully determining a fix by Sunday. Stay tuned...

Thursday, August 2, 2012

Temp Gauge Fixed

Here's a little more info on what's been going on this week with the car.

First, I fixed the temperature gauge. When I drove the car home from the elementary school down the street, I noticed the temp gauge was stuck in the 6 o'clock position and wouldn't move. I tested the sender on the forward side of the engine (had to remove the air cleaner to get to it). I used the ground clip on my power probe to test the circuit. If everything is properly connected, the gauge should max out when the sender is fully grounded. This did not happen and the test had zero effect on the gauge. After searching and reading a little bit on the dmctalk forum, I saw a post that described taking a paper clip and sneaking it in the tolerance between the plastic dash glass and the trip reset button. I snaked one in and was able to barely touch the temp gauge a couple of times with the end of the paper clip. A quick cycle of the key and the gauge moved/reset back to the normal 100 degree reading position (lowest on the gauge scale).

My next project will be to fix the radiator fan circuit. Currently they are not kicking on when they should.

Finally, here is a brief list of work done on the car since 2004. I received this info over the phone from the mechanic out in Phoenix.

  • New transmission cooler
  • AC works
  • New water pump
  • Various electrical work
  • New exhaust system
  • New gauge cluster (2010)
  • New radiator fans
  • No mildew or other smells
I did notice since I've had the car almost 1 week that its got a slow oil leak. Judging on the location, I suspect it's that notorious rear main seal (See Oct 2011 Wheeler Dealers Delorean episode). I'll deal with that later on down the road. For now, I'll have to remember to keep an eye on the oil level.

Wednesday, August 1, 2012

Background & History Part II

Upon reading the advertisement for the car in Arizona I immediately contacted the seller by phone. She informed me that there was another party interested in the car but would get back with me in a day or so if she hadn't heard anything from them. A couple of days passed and she called me back. She filled me in on the specifics of the car. We exchanged email addresses and I immediately started making a list of follow-up questions. After emailing back and forth for another couple of days, she informed me that the car was at her mechanic's shop in Phoenix. She gave me their contact info so I could discuss the car with them from a more technical perspective. In addition, she was able to take detailed photos of the frame and undercarriage while the car was at the shop on the lift.

With all the information in hand and a vehicle history report by VIN, it was time to try and put together a deal. Within another day or two we were able to come to terms. I had never purchased a car remotely unseen like this before. I was timid about it to say the least. We used a reputable online broker to handle the transaction. I had a transport company ship the car to me. The entire process took maybe a week, which I think worked out well. The actual transport time from Phoenix to Dallas was 3 1/2 days from pickup to delivery.


Background & History Part I

I'm not going to waste time citing various movies or other 80's pop culture references pertaining to my affliction with this car since I was a youngster. It should be obvious that my purchase of this automobile justifies any and all aforementioned inferences and their impact on me.

So I'll skip right to the "good stuff". The history of this purchase and this particular car is a long story that I've condensed for a better read.

A little over one month ago, I was perusing through the local classified ads on Craigslist when I stumbled upon a local DeLorean project car with a price tag of $4k. Knowing that these types of ads rarely appear around here I immediately (within a couple of hours from the seller's post) contacted the email address in the ad (there was no phone number listed). I was able to get a reply soon thereafter and scheduled a next day on site inspection. Upon arriving on site I found the car to be in sync with what the seller had described. The engine and transmission were missing from the car, as was the rear fascia, engine cover, louvre, and misc. other parts from both the exterior and interior. I took a handful of photos and discussed the car's history with the owner. This car was apparently driven approximately 13k miles before the engine over-heated. The owner had the engine removed and rebuilt by his Ferrari mechanic. Around that same time the news broke about the John DeLorean drug scandal and the company bankruptcy. The owner said he was embarrassed to even have the car so he put it and the parts in a warehouse where it would sit for the next 30 years. I was told the engine, transmission, and the rest of the missing parts were all on the premises and they would hunt everything down and get back with me the next day. I went home and discussed the situation with my wife who supported my decision to commit to the purchase of this car. Over the course of the next 3-4 weeks, I was given the run around. Emails and phone calls went largely unanswered. Finally I was told by the owner's employee that they could not find the parts and made a mistake listing it prior to locating everything. What a waste of time.


But there is a silver lining. In the time that I was being given the run around, I was actively reading and posting on the dmctalk.org forum, mostly about this adventure with the Dallas project. One afternoon I stumbled across a url posted on that forum to a cars.com ad for another project car out in Scottsdale, AZ.